Create, schedule and approve posts
One post to several networks: publish now, schedule it, queue it, or have the client approve it first.
Write the post
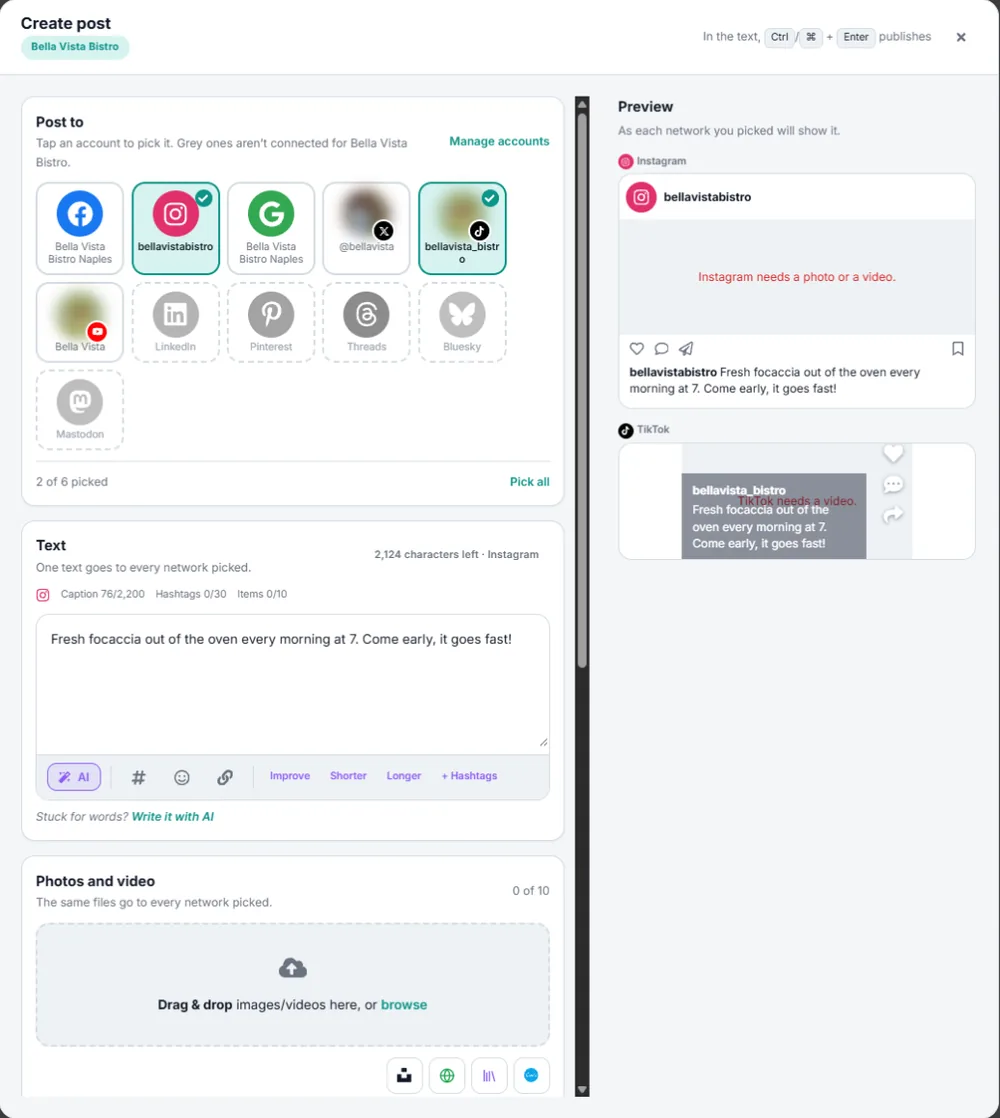
- Click Create post at the top. It opens for the client chosen at the top of the app.
- Post to: tap the accounts it should go to. Greyed ones aren’t connected; one marked Reconnect needs reconnecting first.
- Text: write it, or let the AI write it in the client’s brand voice. Pick a tone first if you like. Each AI caption uses 1 credit.
- A different text for a network: with two or more networks picked, tabs above the text show Main text and each network. On a network’s tab, Write its own text starts from the main text, and Rewrite for Instagram (or any network) has the AI rewrite it the way that network reads best, within its limit (1 credit). Use the main text goes back. The checks, the counter and the preview follow each network’s own text.
- Change part of the text with AI: select a few words and a small bar opens over them: Rephrase, Shorter, Longer, Tone, Translate and Hashtags. Only the selected words change; Undo (or Ctrl+Z) puts them back. Each change uses 1 credit.
- Photos and video: upload files, or pick them from the Media Library, the client’s website or Unsplash. Canva makes a new design in the post’s size or brings one you already made. The pencil on a photo opens the photo editor (see Media Library); the edited photo takes its place in the post and is saved in the client’s library.
- Network settings: what only some networks need — Post, Reel or Story on Facebook and Instagram; who can see a TikTok video; the Pinterest board; the YouTube title; the kind of Google post.
- First comment (Facebook, Instagram and LinkedIn, in Network settings): posted from the same account right after the post, a good place for hashtags or a link. If the network doesn’t allow it, the post still goes out and its result says the comment didn’t. Not on a Story.
- Alt text: ALT on a photo describes it for people who use a screen reader. It goes to Instagram, X, LinkedIn, Pinterest, Bluesky, Mastodon and Threads; Facebook and Google write their own. ALT turns green once a photo has it.
- Ready to post? lists the first problem on each network (too long for X, a missing board…). Fix them and the list clears. The preview shows how the post looks on each network.
The website link
Every new post links to the client’s website, the one saved in Business details, unless the post has a link of its own. Under the text, Website link shows the address and where it goes on the networks picked; the preview shows it too.
- Facebook, LinkedIn, Threads, Bluesky, Mastodon and Telegram: on its own line at the end of the text, unless the text already links to the website. On Facebook a post without photos or a video shows it as a link preview.
- YouTube: the last line of the description.
- Google: the post’s button opens it: Learn more, or the button chosen in the Google settings.
- Pinterest: the pin’s link.
- Instagram and TikTok: nothing is added. A link in a caption can’t be tapped there, so the Link in Bio page is the place for it.
- A post about booking a table, ordering online or the menu links to that page instead, when Business details has its address (Booking link, the menu link).
- X: left out. A link makes an X post cost 15 credits instead of 2, so the website link is never added there. To link an X post anyway, click Change (or add a link in the link box): the cost under the post then says 15 credits.
- Where the networks take trackable links (Facebook, LinkedIn, Threads, YouTube, Bluesky, Mastodon), it goes out as a short link, so its clicks are counted. Google and Pinterest get the address itself.
- The link counts toward each network’s limit. If the text is then too long, Ready to post? says so: shorten the text, or remove the link. The text is never cut.
- Change puts the address in the post’s link box, to change it for this post. Remove leaves it off this post; Add it back puts it back.
- With no website saved, the post window says Add a website in Business details to link every post. A page on a social network or a link list (Facebook, Instagram, Linktree and the like) isn’t used as the website. A post to one location’s accounts links to that location’s own website when its Business details have one.
- A client asked to approve a post sees the link it carries and the networks that get it.
- Turn it off for a client on the client’s page → Business → Website link on posts (an Owner, or a Member who works on the client). Posts already scheduled keep their link as it is.
- Every way of making posts follows the same rule: the queue, repeating posts, the spreadsheet upload, the Smart Scheduler and the first posts at setup, drafts when they are scheduled, and posts from AI assistants, Zapier and the API. A post made without a person to check it leaves the link off a network whose limit it would pass, instead of being refused.
Photos just for Instagram or Facebook
Instagram takes photos from portrait 4:5 to landscape 1.91:1 and shows a carousel at its first photo’s shape, so a tall phone photo has to be cropped for it; Facebook shows a photo under 600 × 600 blurry. Each of them can get its own copies of the photos while the other networks keep the originals:
- Fix for Instagram and Facebook (named after the networks that need it), under the list of photo problems, makes each network’s own copies in one click, only where it needs them: for Instagram the photos it would refuse, cropped from the centre to the nearest shape it takes (4:5 for a tall photo, 1.91:1 for a wide one); in a carousel the other photos get the same shape too when Instagram would crop them anyway. A photo that is small for a network (Facebook under 600 × 600, Instagram under 320 px wide) gets a larger copy for that network, just big enough. Enlarging doesn’t add detail, but the network won’t stretch it further. Ready to post? has the same button for each network. Undo puts the whole click back, even after you typed alt text or moved photos.
- Fit for Instagram only: Square 1:1 · Portrait 4:5 gives every photo an Instagram copy at that shape.
- The pencil on a photo has All networks (the photo itself changes for every network), Instagram only and Facebook only (that network’s own version, made from the original photo) at the top.
- A photo with its own version shows a small badge for each network: IG 4:5 (or its shape) and FB. Click one to edit that version, starting at its current crop; × goes back to the original for that network.
- A Story (or Reel) takes any shape, so it gets the original photos. The copies stay on the photos (their badges fade) and are used again if you switch back to Post.
- The checks and the preview follow what each network gets: Instagram shows Ready once its copies fit, and Facebook is still checked on the originals. A warning a crop can’t fix, such as a photo that is small for Facebook, stays a warning and doesn’t stop the post.
- Unify aspect for all networks and Auto-fit all networks still crop the photos themselves, for every network.
A photo just for Google
Google shows a post’s first photo at 4:3 and cuts off whatever doesn’t fit, so a wide graphic can lose the words at its edges. With Google Business picked, the line under the photos says what Google will cut, and Google can get its own version of the photo while the other networks keep it as it is:
- Fit for Google puts the whole photo on a 4:3 picture and fills the empty bands with the colour around its edges (or a soft, blurred copy of the photo). Nothing is cut off.
- Crop for Google opens the photo editor with Google’s size (Post, 1200 × 900) first under Size for a network…: pick it and drag the frame to choose what Google shows. It’s saved as a new file, so the photo in the post stays as it was.
- Use another photo sends Google a different file, such as a 4:3 version made in Canva.
- Use the post’s photo goes back to sending Google the same photo as everyone else.
The Google preview shows the version Google gets. It’s kept in drafts, scheduled and queued posts and repeating posts. Ready to post? also offers Fit for Google and Crop for Google when Google would cut the photo.
Send it
- Publish now: goes out within seconds. Each network is posted in turn; you can close the window and it carries on. Anything that fails is explained, network by network.
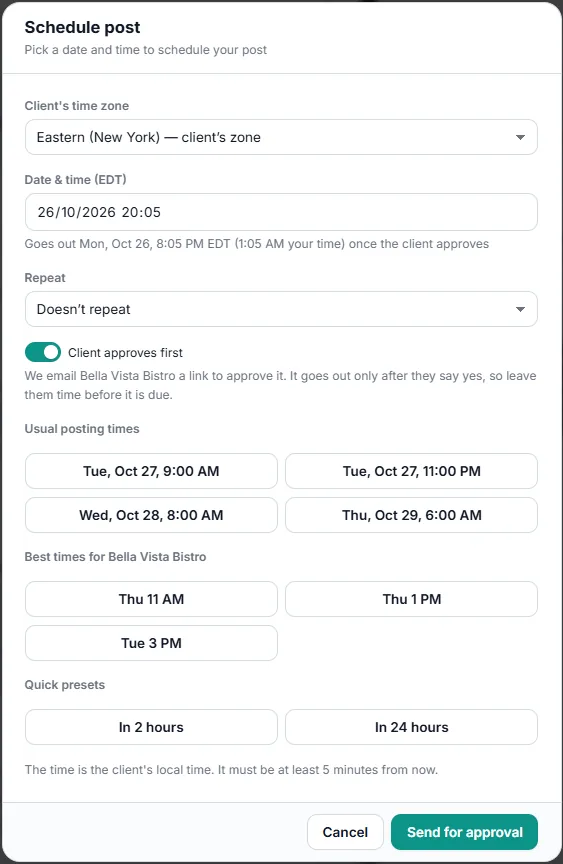
- Schedule: pick a day and time in the client’s local time (at least 5 minutes ahead). The client’s usual posting times and best times are one click away.
- Add to queue: puts the post in the client’s next free posting time, named on the button (“Add to queue · Tue 6:00 PM”). Set them on the client’s page → Business → Usual posting times; see Repeating posts, the queue and recycled posts.
- Save draft: keeps it to finish later: on its day when a time was picked, otherwise in the calendar’s Drafts without a date column.
A post saves itself as a draft a few seconds after each change (the top of the window says Saved to drafts), so leaving the page or closing the window loses nothing: open it again from the calendar’s drafts. Opening a draft, an idea or a file doesn’t make a new draft until you change something. Publishing, scheduling or queueing the post removes its draft. Discard (beside Save draft) clears the post and deletes its draft.
Have the client approve it
- In the Schedule window, turn on Client approves first. The button becomes Send for approval.
- The client gets an email in your agency’s name with a link: Approve & publish or Request changes, with room for a comment.
- The post goes out at its time only once the client approves it, so leave them time before it’s due.
- Once the client has answered, or the link has expired, the link no longer shows the post: it only says so.
Repeating posts don’t wait for the client; they follow your team approval setting below.
Team approvals
To check your team’s work before it goes out, turn on Members’ posts wait for an Owner’s approval in Settings → Workspace. Waiting posts are under Engage → Approvals, where an Owner approves or rejects them (with a reason). Nothing there publishes on its own.
Change a scheduled post
Open it from the calendar and choose Edit. It opens in the same window; change anything, use Change time to move it, then Save changes.
When nothing is planned
The app tells you when a client has nothing planned for a day it usually posts on, so the day doesn’t slip by without a post. It never posts anything itself: you plan and schedule the post.
- When: at 9 AM in the client’s time zone, for that day, and at 4 PM, for the next day. You hear about a day once, even if it’s still empty at both checks.
- What counts as planned: a scheduled post (also one waiting for approval or going out), a queued post, a date of a repeating post, a recycled post waiting for approval, and a post already out that day, on any network. A post that failed counts too (its own notice tells you), and a draft doesn’t.
- The notice: “Bella Vista Bistro has nothing planned tomorrow” with a good time from its best times, such as “3:00 PM is its best time on Instagram” (the network where its posts do best). Without enough past posts there’s no time, just Plan a post?. Several clients at once come as one notice: “3 clients have nothing planned tomorrow”.
- Where: the bell, a push notice on your devices, and the dashboard’s Needs attention (a Nothing planned · Plan a post tile per client, until a post is planned). Plan a post opens the post window for that client with the time filled in.
- Which days: on the client’s page → Business → Posting gap alerts, tick the days under Expect posts on (every day to start), or switch it Off for that client. A paused or archived client, or one with no account to post to, is never checked, nor is a workspace without an active plan.
- Who hears: Owners, until they turn it off. Members only once they turn it on. Both use the On switch of Posting gaps in Settings → Notifications → Email and push, where its email (off to start) and push switches are too. Client logins never get it.
The calendar
- Month, Week and Day (and List on a phone). Each post shows its networks, account and time, a small picture and its first words. The colour down its left edge is its status; the legend under the calendar says which is which. A day in the month shows three posts; +N more opens the whole day at the side.
- Pictures, Text only or Counts (the switch beside Month, Week and Day; in Filter on a phone): Pictures shows each post with its picture; Text only leaves the pictures out, so more posts fit in a day; Counts shows how many posts each network has each day (or each hour in Week and Day), which keeps a busy month readable. Click the counts to see that day’s posts. Your choice is kept for next time.
- Filter finds posts by their words (Search posts) and narrows the calendar to some clients, accounts, networks, statuses or authors. The filters that are on show under the header; the × on each removes it. They are kept for you next time.
- All clients (chosen at the top of the app) shows every client’s posts together, each with the client’s logo or initials, at the client’s own time. The time zone is named on a post when it isn’t yours.
- PDF: the PDF button at the top downloads the month, week or day in view, with the filters that are on, to share or print: in your agency’s name (your logo, your colour), each post with its picture, networks, time and words, and the day’s public holidays and the notes shared with the client. Your team’s own notes stay out of it.
- Day notes: a colour and a short note on a day or several days (“Closed for the holidays”, “Menu photo shoot”). Add one with the note button at the top, the note button on a day, or Add a note in a day’s panel. Choose who sees it: Only me, The team, or The team and the client (it then shows in the client’s portal calendar too). Click a note to change or delete it, or Turn into a post to open the post window with its words.
- Public holidays of the client’s country (from Business details) show on their days, up to two years ahead, with a flag. Click one for a post idea: the post window opens on that day with words to start from. To leave them off for a client, turn off Filter → Public holidays; it changes the calendar for everyone on your team.
- Best times and queue slots: Week and Day show the client’s best times (Best time, with a star: the same three as Best Time to Post) and the posting times from the client’s page → Business → Usual posting times that have no post yet (Queue), faintly in their hour. Click one to start a post at that time. Turn them off in Filter → Best times and open queue slots.
- Drafts without a date (the page button at the top, with how many wait) open in a column beside the calendar. Drag one onto a day or an hour: the calendar asks Schedule this draft? with the time to check (10 AM when dropped on a day in Month) and whether the client approves it first, then it goes out at that time on the accounts it was saved with, with every setting it has. A draft with no account yet opens in the post window instead. Click a draft to open it.
- Media (the pictures button at the top) opens the client’s media library beside the calendar, with a search. Drag a photo or video onto a day or an hour and the post window opens with it, at that time (10 AM when dropped on a day in Month). Pick several files first to post them together, as a carousel. On a tablet or a phone the library opens over the calendar: pick the files and tap New post.
- Drag a scheduled post to another day or hour. The calendar asks Move this post? with the new time, which you can still change, or choose Don’t ask again. If the client already approved the post, it also asks whether to send it to them again.
- Drag a past post to a day or hour still to come and the post window opens with it at that time, to check, change and schedule or publish. A post that didn’t go out (late, failed, or a draft on a past day) moves to the new time: a failed post is the same post put back on the schedule, with what went wrong kept on it. One that went out on some networks only goes at the new time to the networks that didn’t get it and stays as it is on the others, which are never sent again. A published post stays where it is and a copy opens, titled Post again. Closing the window changes nothing. Without a mouse, open the post and choose Move to another day or Post again on another day.
- The ⋯ on each post: Edit, Duplicate (a draft copy opens in the post window), Move to drafts, Send for approval (the client gets an email with a link) and Delete. On a published post: View on the network, Duplicate and See results. A draft copy and a post moved to drafts keep everything: the words, files, accounts and link, and each network’s settings (Post, Reel or Story, collaborators, who can see a TikTok video, the Pinterest board, the YouTube title, a Google event or offer and its button).
Many posts at once
Publish → Posts → Upload a spreadsheet takes a CSV file of up to 200 posts (date, time, text, networks, link, media, first comment), with the option to have the client approve them first. See Schedule many posts from a spreadsheet.
How the marketing is doing
Insights → Overview puts the period’s figures on one page, each against the same number of days before: people reached, engagements, followers gained, website visits, and calls and directions. Below them: reach a day by network (or Posts, what was published each day), the top posts, and each network’s posts, reach, engagement and engagement rate, with Details to its Social analytics. With All clients the figures are every client’s together.
The client’s website
Insights → Website shows the client’s website from Google Analytics: real visits (bots and data centres left out), visitors, engaged visits and time per visit against the period before, visits per day, and what visitors did that counts for a local business: phone taps, directions and clicks through to book or order. From your posts says how many visits the social networks sent and how many people clicked the trackable links in posts, by network, with the links clicked most. Below: where visitors came from, the most viewed pages, towns and devices. With All clients it is a table of every client’s website; a client without Google Analytics gets Connect Google Analytics. The social Analytics page shows the same visits from social in one line, with the way to Website.
Competitors
Insights → Competitors is one page for everyone a client competes with, read top to bottom like the dashboard. A competitor is a business: its Google listing and the Instagram and YouTube its website links, compared with the client’s own over the days you pick.
- At the top: the client’s Google rating, new reviews, how often it is in the top 3 on the map and its Instagram followers, each with its place among the businesses followed and their average.
- Side by side: the client and every business followed in one table across Google, Instagram (followers, growth, posts, engagement rate, likes and comments per post, the kind of post that earns them most) and YouTube. Click a column to sort by it; each row shows its place.
- Who leads: the client’s strongest competitor (the one ahead of it on the most measures) with what they do better in plain words, where the client is ahead and who is close behind; next to it, the best on each measure.
- Click any business for its report in a side panel: head to head with the client on every measure, What to learn from them, each map search, and their posting and best posts. Open as a page gives a link to share; Stop following is there too.
- On Google: the map and the nearby list. Find them searches Google for the client’s kind of business from points all around it (it costs nothing); Follow reads a business’s rating and reviews every week and its Instagram and YouTube every day. Bars show who is in the top 3 most and who collects reviews fastest. Businesses near the client lists the ones not followed yet with the accounts found on their websites, ticked: Follow selected follows them all, Google and social at once. One found only by the website’s name comes unticked, so check it first.
- On Instagram: bars for engagement rate (of their followers, how many like or comment on each post) and how many times each posted, and Add an account by hand for a chain or brand that isn’t nearby. Instagram competitors are read through the client’s own connected Instagram (business and creator accounts only).
- On Facebook: waiting for Meta’s approval to read other Pages; the ones found on followed businesses’ websites are listed meanwhile.
- What to learn from them in a report is advice written by AI from the figures (1 credit), as an adviser sitting with the owner would give it: where the business stands against them, 3 to 5 steps (most worth it first), each with why (what they do and where the business is), how, when and the figure on the page that will show it working, and where the business is ahead. It never suggests anything against Google’s or Instagram’s rules, such as rewards for reviews. It is kept: the report opens with the last one written, with when, by whom and for which dates, and the earlier ones are under Written before. Write again writes it for the dates picked now (the same dates again within a day are free).
- Posts are counted over the dates picked (16 posts from 1 Aug to 30 Oct, about 1 a week), not averaged.
- Follower growth is counted from the day a business is followed (the networks keep no history of other accounts); their posts come with their dates, so posting habits show from the first day. The monthly report has a Competitors table too.
Every post in one list
Publish → Posts lists every post by day (Today, Tomorrow, then the dates), with tabs for Scheduled, Drafts, Awaiting approval, Published and Failed, each with how many it holds. Scheduled and waiting posts read soonest first, the rest newest first. Each post is a card: its picture on the left, and beside it its status, the accounts it goes to, its time in the client’s time zone and its text. Along the bottom is one icon per network: click one to open the post there (an icon is faded until the post is out on that network, with a red ring where it failed). A published Facebook or Instagram post also shows its reach, likes, comments and shares (from a day after it went out). Click a post for its details; its ⋯ menu has Edit, Duplicate, Move to drafts, Send for approval, Recycle, See results, View on the network and Delete. View switches to a grid of the same cards, each with its picture on top, and shows a post to several networks once or once per network.
Publish → Smart Scheduler → Plan writes several posts at once from the client’s business brief (see What we know about a client), or from its website when it has no brief yet. Add Topics (a dish, a season, an event) and the posts are written about them; the same topics mark articles on Ideas. Each post has the post window’s media buttons: upload, Media Library, Canva, Google Drive, Dropbox, the website’s photos and Unsplash. Posts written from the brief take a photo from the client’s Media Library when one shows what the post is about (photos are matched by their tags and by what is in them, see Media Library); a post no photo fits gets none and asks you to pick one. The website button isn’t shown. Edit (the pencil on a post) opens it in the post window with its words, photos, time and the accounts picked, for everything the post window does: Canva, the photo editor, a text for each network, a first comment, alt text. Once it’s scheduled, published or saved as a draft there, its card says so, and Schedule approved and Save as drafts leave it out. Add one more (after the posts) writes one more the same way, about something the others don’t say, for the next free best time (1 credit), also after you rejected some. Posts not yet scheduled or saved stay for that client while the browser tab is open: leaving the page asks first, and they’re back when you return; Discard clears them.
Ideas to share
Publish → Smart Scheduler → Ideas lists new articles from news sites and blogs you pick for the client; the suggested ones suit the client’s industry, and any site with a news feed can be added. Topics mark the articles that mention them, and On your topics shows only those. Share opens the post window with the article’s title and link, ready for your own words; Not for this client hides an article. More in Blog feeds and content ideas.